


Back in December 2016, Ian Shepherd and I had a good chat about stereo width on his podcast, The Mastering Show. In it we covered a great many topics, including M/S processing. However when it came to the nitty-gritty of M/S we certainly left more than a few stones un-turned. If the inner workings of M/S are still something of a mystery to you, or you didn't realize that by using a minimum-phase high-pass filter on the side channel (e.g. to mono your low end) you were completely flipping a portion of the stereo image, read on!
M/S for all!
In recent years there has been an explosion in the number of audio processors on the market which offer mid/side (or M/S) processing capabilities. What was once something of a secret weapon for many mastering engineers is now built into a great many plug-ins, and with them comes the standard line: “Use the mid channel to effect sounds in the middle of the stereo field, and the side channel to effect sounds at the edges.” I’ve heard this explanation repeated more times than I care to count, including by people who should really know better. There’s just one problem: that’s not quite how it works. To understand why, and how M/S does work, I think it will be helpful to look at its history and origins a bit.
A Brief History of M/S
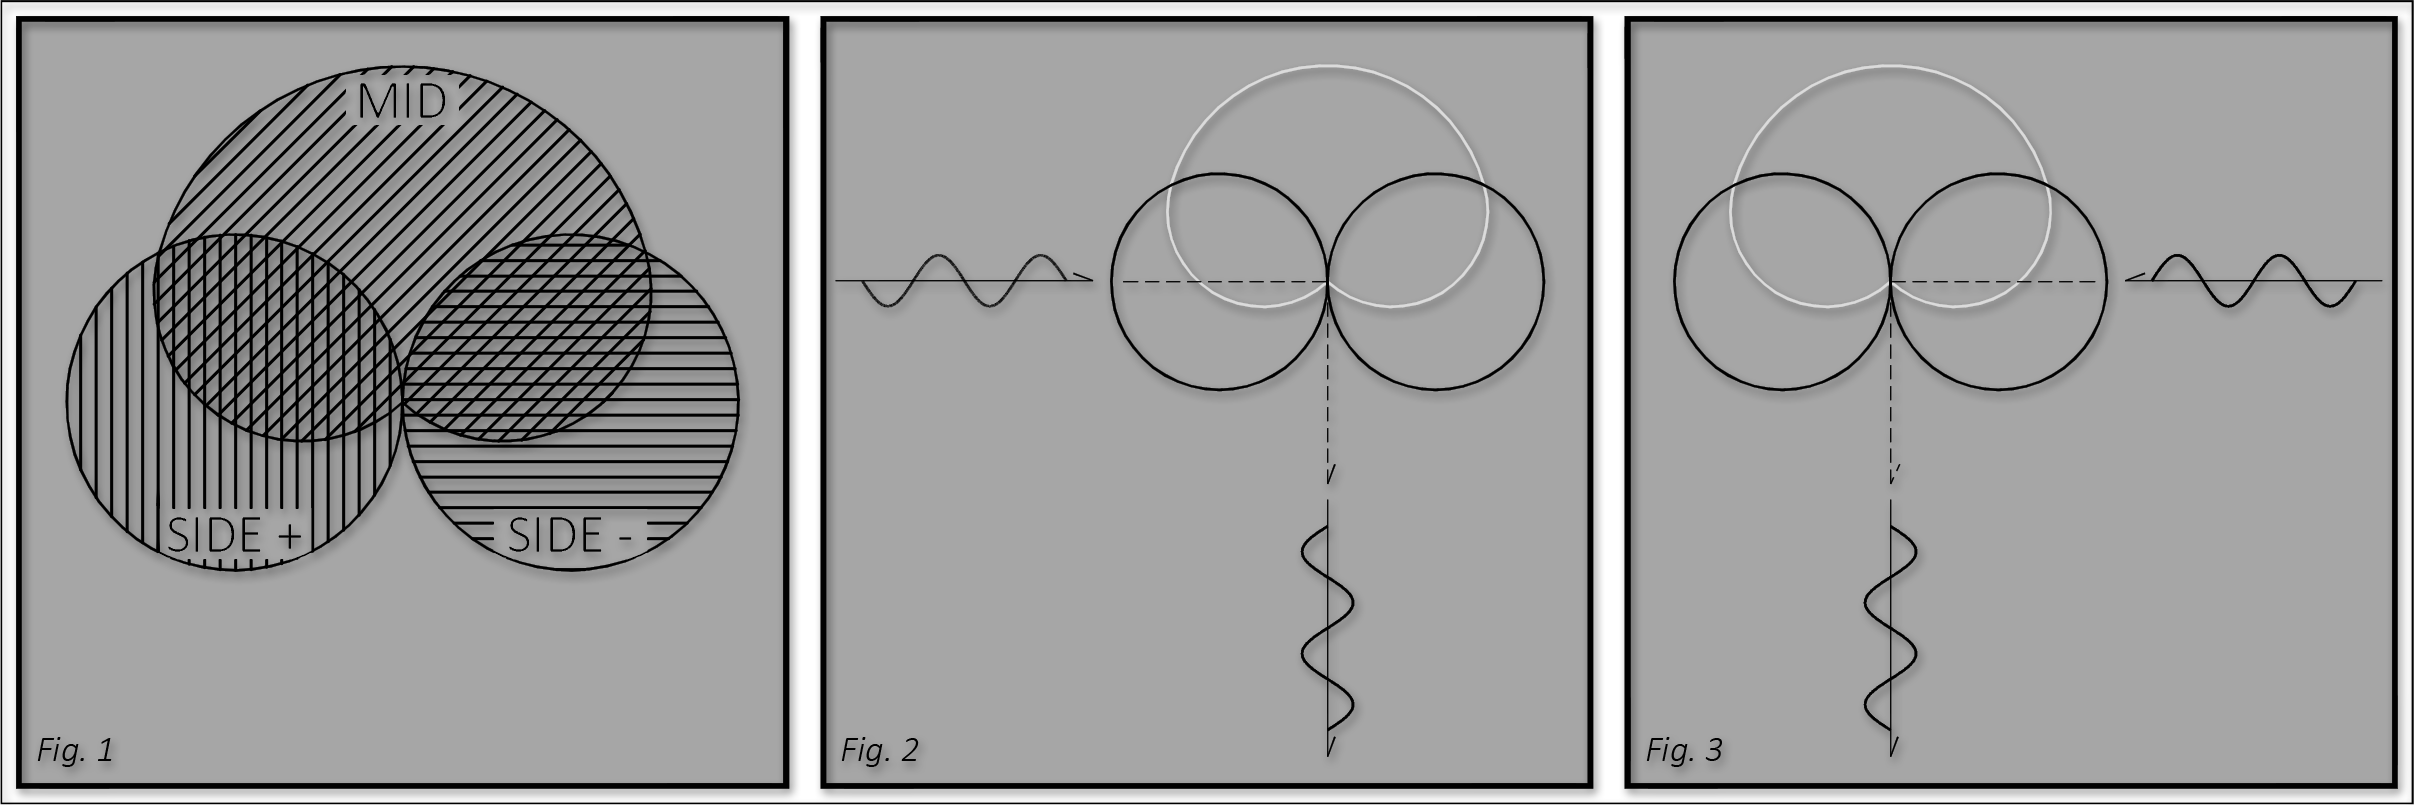
M/S actually dates back to the early 1930s when it was invented by Alan Blumlein, perhaps better known for his Blumlein Pair technique, as an alternative stereophonic recording method. The technique involved using a cardioid (or omnidirectional) microphone facing toward the center of the desired stereo image, and a bi-directional (aka figure-eight) microphone rotated 90 degrees relative to the axis of the cardioid mic [fig. 1]. The premise is that the ‘mid’ mic predominantly pics up the direct sound, while the ‘side’ mic predominantly picks up ambience and reflections, although as we’ll see, even that is an oversimplification. There is one very important factor here that is absolutely crucial to the mid-side miking technique working at all: the two sides of a bi-directional microphone have opposite polarity to one another. This means that a sound source which creates an initial positive deflection when entering the front of the side mic will create an initial negative deflection when entering the back of the side mic [figs. 2 & 3]. Understanding this will also help solidify a comprehension of the process of transforming from M/S to L/R, or vice versa.
Decoding M/S
How then do we convert from mid and side into left and right? It’s actually surprisingly simple: L = M + S, and R = M - S. Let’s analyze this a bit further by thinking of two separate sounds, one coming from the left and one from the right. We already know how the orientation of the bi-directional mic affects the polarity of incoming sounds, and at the risk of sounding obvious I’ll remind you that the cardioid mic behaves the same as the front of the bi-directional mic: a sound source which creates an initial positive deflection when entering the cardioid mic will also create an initial positive deflection when entering the front of the side mic [fig. 4]. Let’s think now about a sound coming from the left. It will produce signals in the mid and side channels which have the same polarity as one another [fig. 5], while the ratio of mid to side will vary depending on how far to the left the sound is coming from (more on this in a minute). If we shift our attention to a sound coming from the right, we realize it will produce signals in the mid and side channels which have opposite polarity to one another [fig. 6], with the ratio again depending on the precise direction.
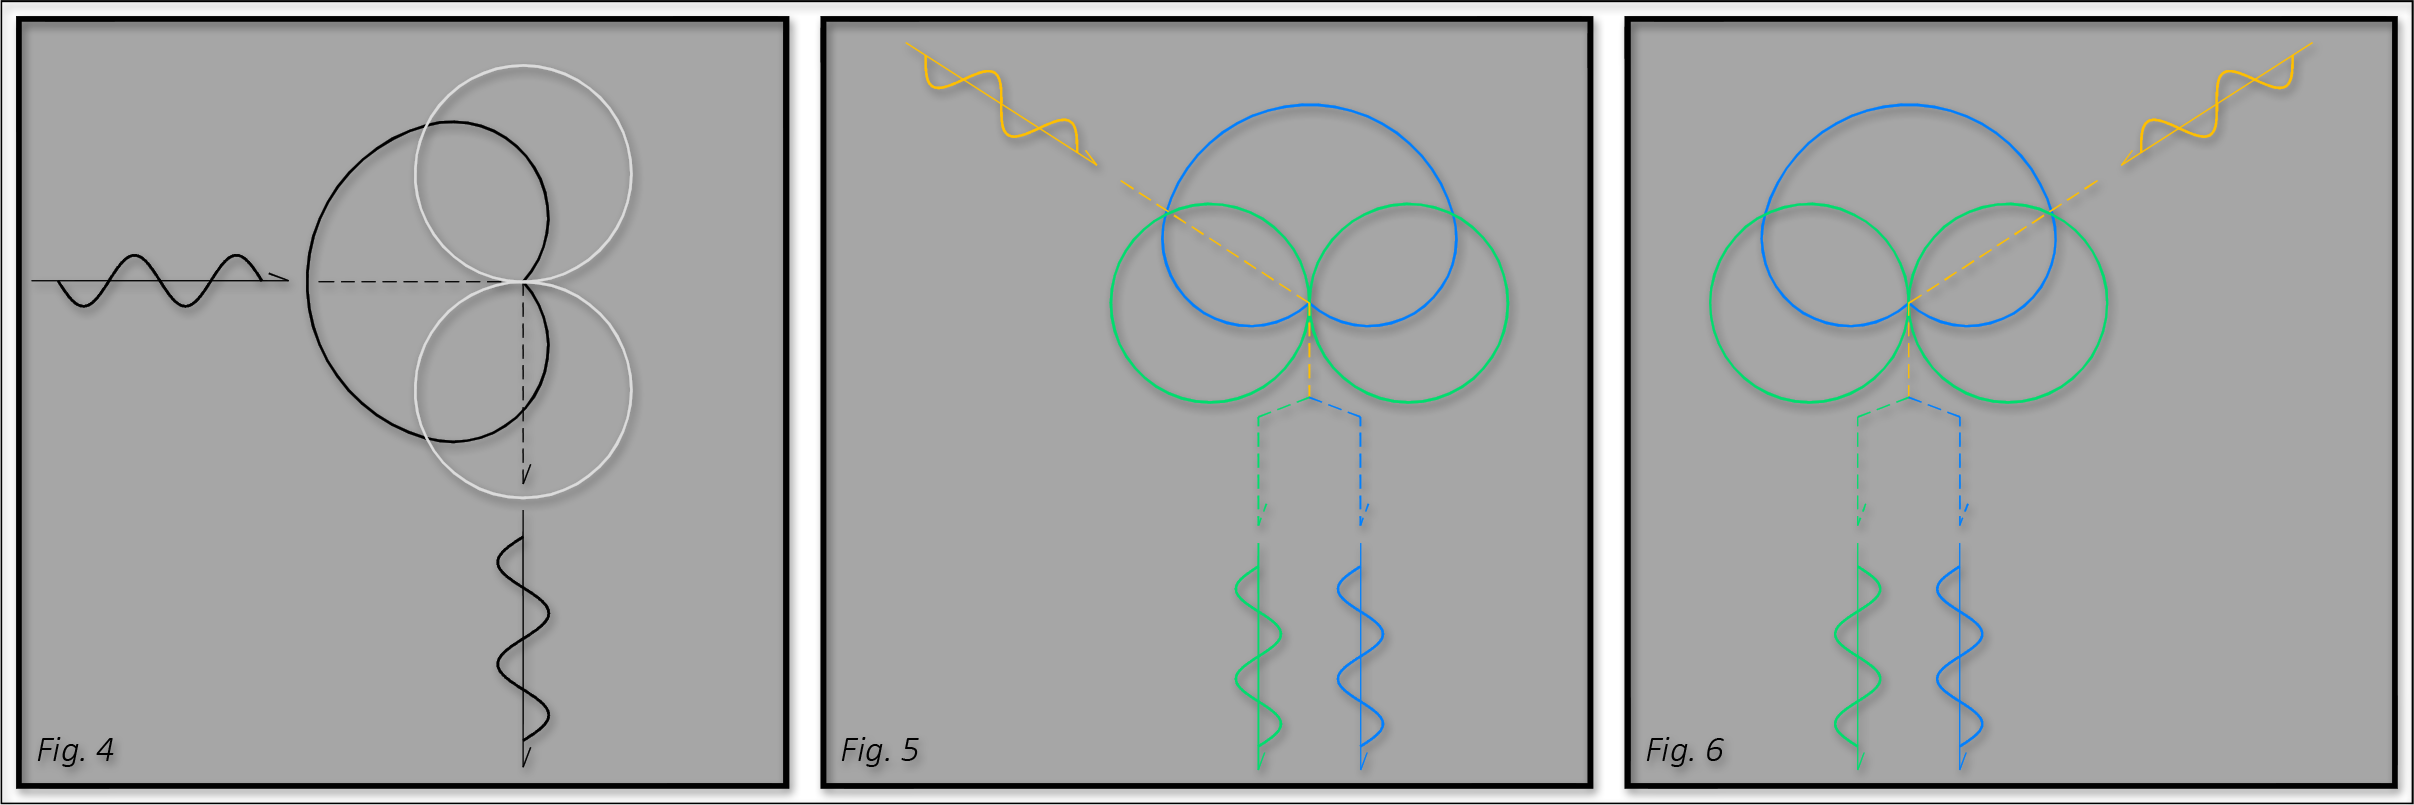
Once this is understood, it’s not hard to see that by adding the mid and side channels together sounds from the left are reinforced while sounds from the right are canceled (due to their inverted polarity on the side channel) and we can therefore recover sounds from the left. Conversely, to recover sounds from the right we will need to invert the polarity of the side channel and then add it to the mid channel. By doing so sounds from the right are reinforced while sounds from the left are cancelled. To state this more simply (albeit semi-mathematically), Left = Mid + Side, and Right = Mid - Side (adding a polarity inverted version of the side channel to the mid channel is equivalent to subtracting the side channel from the mid channel). As I alluded to earlier, the direction of the sound source influences the ratio of mid to side signal. When a source is straight ahead (e.g. centered), it hits the null point of the bi-directional mic and appears only in the mid channel, but as it moves even slightly to the left or right the level begins to rise in the side channel and fall off in the mid channel due to the response patterns of the cardioid and bi-directional mics. Crucially though, even when a sound source is to the hard left or right of the mid-side pair, and even if it is slightly behind it, the sound still makes its way into the mid channel. This is our first clue that manipulating elements in the mid channel will affect more than just centrally panned sounds while manipulating elements in the side channel will affect more than just the edges of the stereo spectrum.
Still with me? Fantastic. At this point you’d be excused for thinking, “Ian, that’s all fine and good, but what does this miking technique have to do with mastering topics like M/S EQ or compression?” Well that’s next, and with our newfound understanding of how mid and side correspond to left and right I think the ramifications will be a bit more readily apparent. But first I want to briefly discuss how we can turn left and right back into mid and side. After all, in mastering we're almost always dealing with a stereo (left and right) track.
As we've already seen, the left channel is simply a sum of the mid and side channels, while the right is a sum of the mid and polarity inverted side channels. Put another way, right is the mid minus the side, and put yet another way it is the difference between the mid and side (i.e. the difference between 5 and 3 is 2, just as 5-3=2 and 5+(-3)=2). Earlier I stated this as L = M + S, and R = M - S, and with a little bit of algebra it's relatively trivial to show that M = (L + R) / 2, while S = (L - R) / 2. Here we again see that although there is a level change (the divide by 2 terms), mid is just a sum of left and right while side is the difference between them. It is for this reason that I feel that while mid and side may adequately describe the mics used in the recording technique, sum and difference is a much better name for the overall method.
Why All This Matters
Now, on to the good stuff. Let’s examine a few ways M/S processing might be used in mastering and analyze the pitfalls or side effects we may encounter as a result.
First let’s think about perhaps the simplest use case: some gentle general EQ. It’s not uncommon to hear someone talk about EQing just the mid signal perhaps to enhance a centrally panned vocal while leaving the hard panned guitars alone, or conversely to reign in a harsh portion of a centrally panned guitar, while leaving the top end of the drums at the edges of the stereo field alone. Or perhaps the opposites are true: the hard panned guitars are too bright while the centrally panned vocals are fine, or the edges of the drum overheads are a bit dull while the guitar solo in the middle really can’t handle any more top end, so adjustments to just the side channel are made. Can you see what the problem is here though? Changes to the mid channel will still affect hard panned elements (remember, mid = left + right) and changes to the side channel will affect the entire stereo field except for elements which are perfectly centrally panned. There is a saving grace here: the effect is not equal across the stereo field (although it is symmetrical). This means that while a change to the mid channel will still affect hard-panned elements it will not affect them as strongly as it will centrally panned elements. However, when EQing only the mid or side it is important to keep an ear out for sounds changing in other parts of the stereo image as well.
Second, I’d like to examine another common and perhaps slightly more complex EQ use case. If you’ve spent any time on the internet you’ve probably heard about the benefits of mono-ing the low end. There are plenty of decent reasons to do this, however it’s important to be a bit careful of just how you do it. Probably the most common method is to use a high pass filter (aka low cut filter) on only the side channel. Seems reasonable enough, right? By removing low frequencies from the side channel you leave only the mid component, and without any of the pan information encoded into the side channel everything below the cutoff frequency of the filter is shifted to the center of the stereo field, or mono-ed. Right? RIGHT?! Well, it depends. In minimum phase EQs there is a very strong phase shift associated with a high-pass or low-pass filter. In fact, at the cutoff frequency the phase is rotated a full 180˚, which is effectively the same as inverting the polarity. Do you see where this is going? As you may recall from figs. 2 & 3, the difference between left and right in the side channel is simply polarity, or 180˚ of phase. This means that if you’re using a minimum phase high-pass filter on the side channel, the stereo image will actually flip completely at the cutoff frequency before returning to normal as you extend above it. Again, we have a saving grace, this time in the form of linear phase EQ. While this flipped stereo effect is most noticeable with high (and low) pass filters in minimum phase EQs, all minimum phase filter shapes (bells, shelves, notches, etc.) have a phase shift associated with them. The takeaway here is that any time you are using M/S EQ, it is certainly worth auditioning a linear phase variant. It may not always be necessary, but chances are good that unless you are doing very subtle adjustments, a minimum phase EQ may be affecting stereo placement as well as level.
Third, and finally, I’d like to explore M/S compression a bit. The reasons to use M/S compression are perhaps less obvious than those for using M/S EQ, however every once in awhile you’ll come across a song that presents a unique set of challenges which seem best tackled by M/S compression. Perhaps a kick drum in the middle is making hard panned elements pump in a particularly noticeable way when stereo compression is used, or maybe some hard panned backing vocals are overwhelming the lead at times and you want to just reign them in at their loudest points. M/S compression can certainly be worth a try in these types of scenarios, but as we’d expect by now, there are a handful side-effects which can crop up. Thankfully they are a bit easier to analyze. As you may recall, how much of a given signal ends up in the mid and side channels is dependent on its pan position. Conversely, a signal’s pan position can be manipulated by adjusting it’s level in the mid or side channel. Hopefully you’re beginning to see the potential problem here. By compressing the mid or side channels independently you can begin to modulate the width of an entire mix dynamically. After all, compression is simply dynamic level adjustment. Unfortunately in this case there’s not much of a saving grace. If the compression is subtle enough, or the timing is just right, the width modulation may escape being noticeable, but it typically involves a significant time investment to get the settings just right and in the end may not offer much, if any, benefit.
Great, So Now What?
At the end of the day, it may sound like M/S is barely worth using for all the pitfalls along the way, and that the old mastering maxim of “Do No Harm” may be nearly impossible to uphold. However this is certainly not the case. In its simplest form, adjusting the overall balance between mid and side levels can be a very effective method of width control and manipulation. There are also certainly times when a touch of mid/side EQ can make a track fall into place, and provided a linear phase EQ is used it can be a very effective way to mono the low end. I’ve even successfully employed mid/side compression once or twice.
The important information to take away here is that making adjustments to the mid and side channel is not as simple as affecting the center and the edges of the stereo field. The real danger here is confirmation bias. If you think that by boosting 1k in the mid channel you’re only affecting the vocal, you may only hear that change and not notice that it is also impacting the guitar panned hard left, or the tambourine panned hard right. Or you may be so focused on how your side channel compression is nicely controlling those overly dynamic background vocals that you miss the fact that the whole stereo width is narrowing and widening with their changes in level. Perhaps you’re so focused on how the bass is now nicely mono-ed that you don’t notice that the low end of the keyboards have flipped from left to right.
Once you know of these side effects however, you can begin to listen for them in your work, thereby ensuring the changes you make to your or your clients’ music are the ones you intend, and only the ones you intend.
Happy mid-siding.